This project has presented a wide variety of problems to us as a group and as individuals. We had evolved our idea from an environment piece into a short story using visual audio and written clues. From here we had formed layout and a rough animatic of what all of our project entailed. By structured delegation and good communication headed by Ollie and Steph, we had to pipeline to strict schedules for our project to meet our deadline. We also had to insure the successful transfer of updated files etc to be worked in by multiple people on multiple computers.
Once this was done we all went away with our own small part in this puzzle and constantly accepted constructive criticism to better the project work to a high standard.
I feel that I have personally developed in many ways after finishing this project. My lighting skills have improved with every scene that I have been involved in and my familiarity with dynamics as a whole has built up my confidence greatly. Many lessons have been learned from my fellow peers as well, who without this project could not have been accomplished. With a special thanks to Ollie, Steph and Greg, who have collectively brought the standard of this piece to an extremely high level.
We essentially developed a piece that in my opinion has a multitude of assets assosciated to it. Each one is significant in its own right and is arguably the best piece of work that I have been able to be a part of. I feel greatly matured and accomplished, confident and eager to maintain this standard making more improvements based on the same work ethic that we adopted over the past ten weeks.
Monday, 10 January 2011
Friday, 7 January 2011
FInal touches
I was heavily involved in the lighting of our work- however one stage was yet to be done- the final composite. This was done by Ollie in our group. However myself and Greg worked along side Ollie to ensure that the colour grading matched and contrasted when appropriate.
Here are some of the differences between the scenes that I was involved with lighting.


Here are some of the differences between the scenes that I was involved with lighting.


Sunday, 2 January 2011
Final Dynamics- The falling ink pot
Finally I had come to the last and arguably on =e of the most interesting shots.
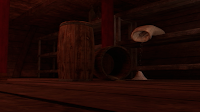
We are in the middle of a collection of symbolic clips that represent the downfall of this ship/this ideal. We cut back the the same location where we started- i.e the admirals room. One effect that we had to simulate was the falling of the ink pot on the boat/map. The symbolic meaning behind this bases from the fact that we see the map "filling in" before hand- yet the it is the very ink which did that which soils/undoes/hides the map once again. Through our research we discovered that soon after Zheng He fleet was decommissioned, his very memory was erased from the history of China, despite being the first fleet to discover lands decades before Vasco De Gamma and Columbus. Hence again its meaning was potent and a necessary addition to our ending scene.
Ideally, effects of this type are not usually done on Maya directly. Many software such as Houdini and RealFlow are much better equipped for fluid simulations. However, given the constraints, the time frame of the scene, I chose to create a simulation using nParticles.
nParticles have similarities and differences with dynamics particles. Some of the differences include nuclei central to each nParticle. By default, every nParticle will collide with a passive collider. they also come with inbuilt simulations such that the nParticles can behave a certain way- one of them being water. These contain all of the information for the particles to interact like water particles.
I first did a test where I followed the following procedure. I created a piece of stand-in geometry- like a sphere. I "filled" this sphere with nParticles. I then deleted the sphere and allowed the nParticles to fall into a rigid body container- i.e the ink pot. When it had settled I created an initial state from current so that the simulation started from that point every time. I then simply animated the ink pot, which in turn, reacted with the nParticles, which could spill on to the passive collider-table.
Once the particles mapped out a suitable path, I converted these nParticles into polygons. Finally I had to tweak attributes such as the blobby size radius, mesh smallest triangles etc. Using this I created a fully animated mesh that could then be cached and rendered. Here are my working stages from trail to final version.
The most difficult aspect of this was trying to get both the fluid simulation right and the animation of the spilling pot.
Here is the final test before was rendered
By applying a blinn texture with slight modifications to its eccentricity etc, I managed to obtain this for the final rendered scene.

Although the image contains some minor anomalies, I am quite pleased with the result and think that that shots will blend nicely.
Subscribe to:
Posts (Atom)