This project has presented a wide variety of problems to us as a group and as individuals. We had evolved our idea from an environment piece into a short story using visual audio and written clues. From here we had formed layout and a rough animatic of what all of our project entailed. By structured delegation and good communication headed by Ollie and Steph, we had to pipeline to strict schedules for our project to meet our deadline. We also had to insure the successful transfer of updated files etc to be worked in by multiple people on multiple computers.
Once this was done we all went away with our own small part in this puzzle and constantly accepted constructive criticism to better the project work to a high standard.
I feel that I have personally developed in many ways after finishing this project. My lighting skills have improved with every scene that I have been involved in and my familiarity with dynamics as a whole has built up my confidence greatly. Many lessons have been learned from my fellow peers as well, who without this project could not have been accomplished. With a special thanks to Ollie, Steph and Greg, who have collectively brought the standard of this piece to an extremely high level.
We essentially developed a piece that in my opinion has a multitude of assets assosciated to it. Each one is significant in its own right and is arguably the best piece of work that I have been able to be a part of. I feel greatly matured and accomplished, confident and eager to maintain this standard making more improvements based on the same work ethic that we adopted over the past ten weeks.
Monday, 10 January 2011
Friday, 7 January 2011
FInal touches
I was heavily involved in the lighting of our work- however one stage was yet to be done- the final composite. This was done by Ollie in our group. However myself and Greg worked along side Ollie to ensure that the colour grading matched and contrasted when appropriate.
Here are some of the differences between the scenes that I was involved with lighting.


Here are some of the differences between the scenes that I was involved with lighting.


Sunday, 2 January 2011
Final Dynamics- The falling ink pot
Finally I had come to the last and arguably on =e of the most interesting shots.
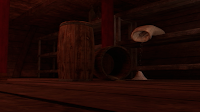
We are in the middle of a collection of symbolic clips that represent the downfall of this ship/this ideal. We cut back the the same location where we started- i.e the admirals room. One effect that we had to simulate was the falling of the ink pot on the boat/map. The symbolic meaning behind this bases from the fact that we see the map "filling in" before hand- yet the it is the very ink which did that which soils/undoes/hides the map once again. Through our research we discovered that soon after Zheng He fleet was decommissioned, his very memory was erased from the history of China, despite being the first fleet to discover lands decades before Vasco De Gamma and Columbus. Hence again its meaning was potent and a necessary addition to our ending scene.
Ideally, effects of this type are not usually done on Maya directly. Many software such as Houdini and RealFlow are much better equipped for fluid simulations. However, given the constraints, the time frame of the scene, I chose to create a simulation using nParticles.
nParticles have similarities and differences with dynamics particles. Some of the differences include nuclei central to each nParticle. By default, every nParticle will collide with a passive collider. they also come with inbuilt simulations such that the nParticles can behave a certain way- one of them being water. These contain all of the information for the particles to interact like water particles.
I first did a test where I followed the following procedure. I created a piece of stand-in geometry- like a sphere. I "filled" this sphere with nParticles. I then deleted the sphere and allowed the nParticles to fall into a rigid body container- i.e the ink pot. When it had settled I created an initial state from current so that the simulation started from that point every time. I then simply animated the ink pot, which in turn, reacted with the nParticles, which could spill on to the passive collider-table.
Once the particles mapped out a suitable path, I converted these nParticles into polygons. Finally I had to tweak attributes such as the blobby size radius, mesh smallest triangles etc. Using this I created a fully animated mesh that could then be cached and rendered. Here are my working stages from trail to final version.
The most difficult aspect of this was trying to get both the fluid simulation right and the animation of the spilling pot.
Here is the final test before was rendered
By applying a blinn texture with slight modifications to its eccentricity etc, I managed to obtain this for the final rendered scene.

Although the image contains some minor anomalies, I am quite pleased with the result and think that that shots will blend nicely.
Wednesday, 29 December 2010
Dynamics Tests: Candle Test 01, making another script
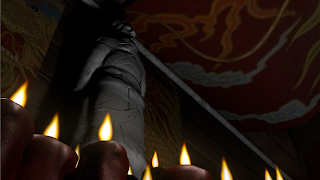
My next job was to create another very important effect that was central to our opening and closing scene. I took on board the challenge of creating multiple candles that would change under the atmosphere.
In our composition, we open our scene with gentle candles light a room. Starting with a close up that is blurred in, and then cutting to a mid shot. Just after this we have a close up shot of a candle moving with an introductory shot of the emperor statue. The next time we see candles, they are being blown in the wind through the discovery of the factual situation of the ship, and finally the closing shot ends with an extinguishing fame of the last candle flame. The significance on the scenes place highly their importance in our short film. Hence trying to simulate accurately the flickering was crucial.
Analyzing the first two shots- I concluded that a smart way to go about finishing them was to create the mid shot, then create an additional camera to suit the first close up- Hence i would complete two shots in one provided that I created realistic candle light.
This was a prime example of some excellent team work. The statue was modeled by Ollie, the candles were modeled and textured by Steph, now I had to set up the lighting and the candles. This required constant communication between the group and good organization with project files etc.
Here is the image I was asked to follow.

On top of this I had to create a number of these candles similar yet unique.
At first I tried experimenting with fluid containers by creating one, caching the simulation and the replicacted it on another empty fluid container. I also considered using sprites, and image sequences but I felt that I was not able to create the uniqueness of each candle.
I decided that the best way to achieve a number of unique candles was to individually create them. Before doing this I had to create one first.
Having not been very familiar with fluids, I was overwhelmed, just as with the ocean shots, with the number of attributes that make up a fluid emission. However I used the knowledge that I gained from the ocean scenes- i.e taking a systematic approach to tweaking settings.
I eventually found that fluids have a wide range of controls to determine the way they look. One has indivual controls on the turbulence, boyancy and other key fluid attributes for values such as temperature, fuel etc.
Once I had one candle flame- I faced an even bigger problem. How to create many? I found that simple duplication did not produce the result.
I decided to make a simple script. Firstly I took all of the important candle.shape attributes needed to create the colour and feel that I wanted.
After this, I wrote a script that created candle flames of an exact type to match up with the first approved candle. I applied this script several times and placed them appropriately.
Finally I create a cool script which selected every single fluid container and the altered the "start frame" attribute from -100 to -50 frames before the desired time. This meant that every single candle flame started at a random time- meaning a slightly subtle but necessary difference between each flame.
Here are some test images and videos that show the progress of my work.


Here is the final tweak of the candle shot

Friday, 24 December 2010
More Shatter Tests Finalized
Here are some screenshots which demonstrate the application of the shatter script on my 3 separate geometries.

Here are the final versions of my shatter effect that would eventually be used in the final product.
Final Statue crumble test...
Final Rendered scene:
Without Ray trace shadows:


Greg Managed to spot a very interesting point about this scene. He wondered if I was using shadows to be emitted from all lights- but in particular- the ones below. I discovered that I was not and upon re-rendering found a vast change in the scenes' overall depth and impact.
With ray traced shadows...the final render


Statue crack shot
The Final render...

Sunday, 19 December 2010
Applying the Shatter Script- Destroying Anomalies!
Now that I had fully tested my script on a basic piece of geometry, the time had come to really put the script to the acid test. I had not yet had any experience in doing these various effects on objects imported from Z-Brush where Ollie Kane had sculpted the model and hence was apprehensive about it. How would the model be affected with regards to its topology?
With this in mind, I proceeded with testing. Here is the first model I received from Ollie and the consequent testing trial.
Doing this test taught me a lot about the necessary requirements that Ollie would need to adjust for me to optimize my shatter effect to its fullest.
On observing the video above, there were two main conclusions to be derived.
Probably the biggest error of all is found with the head. You will notice that it is completely unaffected by the shatter effect. Upon discussing the matter with him further, my suspicion was proved correct that the head had two major defects. One was that the head was not a closed piece of geometry. By definition a solid shatter would fail to effect it as it is not even a solid piece, i.e closed. Its second major flaw was that it was simply combined from one mesh from two. I will address this point later as it sparked an idea for improvement. But one may see how confusion may arise as to what needs shattering if the mesh is one combined mesh from multiple objects.
The second point that you will notice is that even though I pushed the shard count as high as I could, we have a very uneven distribution of shard sizes. Thinking about this problem, I had two objectives to achieve- to increase the number of shards and keep these pieces relatively equal in size. I decided that if i wanted Maya to be optimized then it would be better to have the mesh separated into three (or ideally more) separate uncombined pieces. In this way- we would avoid having very large pieces that span the model from to bottom, and this also means that the maya shatter can be applied on each piece separately.
Since Maya struggles with calculating a high count of shard shatter in one go- it logically foillowed that maya may be able to to multiple shatters one turn at a time. i.e instead of applying a 100 piece shatter on the entire statue, model the statue into 3 pieces and create 3 shatters each with 33, 33, 33 shatters- these two operations are equal, yet one may cause maya to each and one will not. In this way I managed to create a shard count that exceeded 600 pieces all in all, where as when i tried applying a shatter before, the maximum shard count was under 50.
Then I was able to apply the collision layer correction script to then avoid any issues that would cause errors.
Here a sequence of videos that depict the evolution of my effect based on the logic above.
Here the tweaking was made to create a slow motion effect from the shatter.
Saturday, 18 December 2010
Developing a Script
Having made a shatter that fundamentally worked with a reduced number of shards, the time could now be invested in solving the problem for any number of shards.
Effectively the only thing which was required to be done was to alter the collision layer. This is a relatively simple task in scripting. However I purchased a tutorial which gives a very detailed rigid body solution. Not only does the script alter collision layers, it also has options to alter initial velocities/rotations between a random range.
After listening in on what the script set out to do- i.e the pseudo code, I stopped the tutorial and continued to make the entire script from scratch with only a few parts cross verified (usually to do with graphic interface). One way to substantiate this is that the tutorial was written in MEL, where as I program mainly in python and therefore the script can not be directly copied with out a fundamental understanding of scripting.
Having set out to do this, I created the entire script successfully and eliminated all the problems I encountered before. Here are a few tests that demonstrate the progression of a basic test. Since Maya finds the shatter effect a very difficult calculation, I decided to increase the shard count progressively.
I also incorporated a turbulence field or radial field along side the gravity field.
Shard Count: 15 field: turbulent and gravity
Shard Count: 50 field: turbulent and gravity
Shard Count: 70 field: gravity and radial
Shard Count: 70 field: gravity and radial (Animated camera)
Subscribe to:
Posts (Atom)